

This scrumptious, flaky, buttery Danish dough recipe is straightforward; although it’s time-consuming, it’s properly value it!
This recipe is less complicated to make than your typical pastry dough recipe however yields the identical outcomes, particularly when utilizing a number of baking sheets lined with parchment paper.
Danish pastry dough shares an analogous texture to croissant dough however has a sweeter taste profile as a result of inclusion of eggs.
Each doughs require layering butter to realize a flaky consequence.
A simple-to-use, full bread machine with versatile, delicate dough.
Use This Button to Save This Recipe to Yummly
Yum
Obtain the Printable Recipe Card Right here
Simple Danish Pastry Dough Recipe (together with unsalted butter)
Components
1-1/2 cups all-purpose flour
2 tablespoons white sugar
2 teaspoons lively dry yeast
1/2 teaspoon kosher salt
1-3/4 cups unsalted butter, chilly
1 massive egg
1/4 cup chilly milk
2 tablespoons room temperature water
That is what you get . . . .
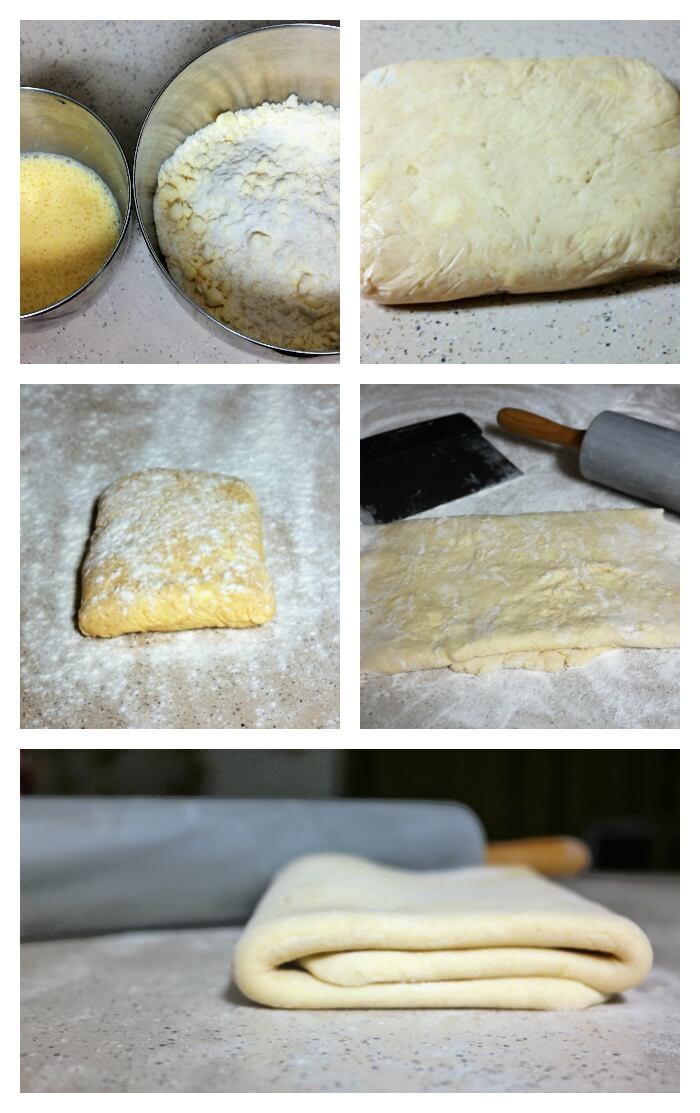
Understanding Lamination
Lamination is the center of making the proper Danish pastry. To attain the specified texture, the dough have to be laminated, which entails rolling, folding, and permitting durations of chilling.
To develop correctly, the dough requires an increase time of 8 to 12 hours within the fridge. That is most popular for a extra flaky pastry. Whereas they rise, the pastries ought to be lined calmly with greased plastic wrap.
This course of entails rolling out the pastry dough and folding it a number of instances to create skinny layers of the buttery pastry and dough, which give the pastry its attribute flaky texture.
The laminating course of is normally accomplished with 3-4 folds and rests between every. Laminate the dough by inserting a butter slab between two layers of dough and folding it.
It’s endorsed to make use of high-fat European-style butter for making pastries.
With out correct lamination, the dough would lack the fragile, ethereal construction that makes Danish pastries irresistible. Mastering this system is important for any baker to create genuine Danish pastries.
Instructions for Danish Pastry Dough
Mix the sugar, flour, yeast, and salt in a meals processor and pulse twice.
Add the chilly butter in small chunks to the smaller bowl of a meals processor and pulse till it kinds into items the scale of peas.
Switch the combination to a big bowl and put aside for future use.
Whisk collectively the milk, egg, and water in a medium bowl.
Add the moist components to the dry components and fold along with a rubber spatula.
Place about half of the dough in your work floor onto a plastic wrap and mould it right into a rectangle.
Place within the fridge for no less than 3 hours.
Roll the dough out in an 8×15 inch rectangle on a calmly floured floor.
Fold the dough over into thirds like a letter going into an envelope.
Roll again out right into a rectangle the identical measurement as earlier than.
Repeat this step as soon as extra for a complete of three instances.
Mud with a few tablespoons of flour as you go alongside.
Word that it’s going to look shaggy and damaged whenever you roll it out, so don’t fear!
By repeating this course of, it is going to look extra uniform and easy.
You will note chunks of butter in your dough, which is sweet.
Wrap the dough in plastic wrap and place it again within the fridge for no less than 1 hour longer.
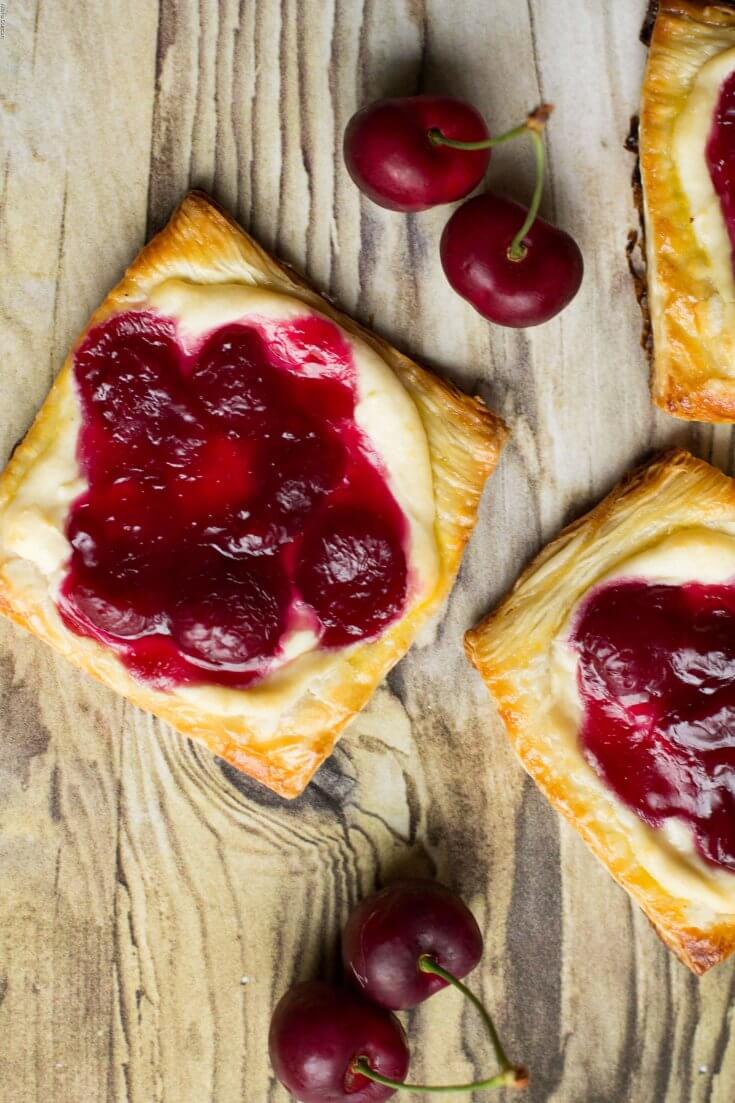
As soon as the dough is prepared, you’ll be able to add a wide range of fillings, equivalent to fruit filling made with jam, preserves, or chopped fruits of your selection.
Take away the dough from the fridge and repeat the earlier step thrice.
Rewrap the dough and refrigerate it for 3 extra hours. Then, the following day, revisit your Danish dough.
Creator: Jennifer is an eco-loving Mama of two stunning little ladies. She loves cooking and baking from scratch, getting artful, and taking part in along with her youngsters.
Laminating the Dough
To start laminating the Danish pastry dough, roll it out into a big rectangle on a calmly floured floor. Place a block of chilly butter within the middle, leaving a 1-inch border across the edges.
Fold the dough over the butter, very like folding a letter, after which roll it out once more into a big rectangle.
This folding and rolling course of is usually repeated three to 4 instances to realize the specified degree of lamination.
This repetitive course of ensures that the butter is evenly distributed all through the dough, creating these coveted flaky layers.
Shaping the Pastry
As soon as your dough is completely laminated, now form it into numerous kinds.
Then, roll out the dough into a big rectangle.
Subsequent, utilizing a pastry cutter or knife, lower out your required shapes, equivalent to croissants, Danishes, or pastry braids.
Place the formed pastries on a baking sheet lined with parchment paper, making certain there’s about 1 inch of house between every bit.
Brush the pastries with an egg wash to provide them a fantastic golden brown end when baked.
Pop them within the oven and bake till they’re completely golden brown and flaky.
The pastries are baked till golden brown, sometimes between 15 to twenty minutes.
Filling and Assembling the Pastries
As soon as your laminated dough has been rolled out to the specified thickness, you fill and assemble your scrumptious Danish pastries.
Select your favourite filling: candy fruit, creamy cheese, or wealthy chocolate. Unfold the filling evenly over the middle of the dough, leaving a 1-inch border across the edges to forestall it from spilling out throughout baking.
Subsequent, fold the dough edges over the filling to create a seal. Gently press the perimeters collectively to forestall leaks.
Utilizing a pastry brush, apply a skinny layer of egg wash to the perimeters of the 2 dough rounds. It will assist the pastries obtain a fantastic golden brown shade when baked.
Place the pastries on a baking sheet lined with parchment paper, leaving about 1 inch of house between every pastry.
Cowl the pastries with plastic wrap and allow them to rise in a heat, draft-free place for about one hour or till they’ve overrated barely. This step is essential for reaching the proper texture in your Danish pastries.
Baking and Adorning the Pastries
Preheat your oven to 375°F (190°C) and put together a baking sheet lined with parchment paper. Fastidiously place the risen pastries on the ready baking sheet, making certain there’s about 1 inch of house between each to permit for even baking.
Brush the tops of the pastries with a skinny layer of egg wash and sprinkle with granulated sugar for an additional sweetness.
Bake the pastries for 15-20 minutes or till golden brown and flaky.
As soon as baked, take away the pastries from the oven and allow them to cool on a wire rack for 5-10 minutes earlier than serving.
Drizzle the pastries with a easy powdered sugar glaze made out of powdered sugar and milk for an added contact of sweetness.
Serve the pastries heat, dusted with powdered sugar, and benefit from the fruits of your labor!
Following these steps will create fantastically golden brown, flaky Danish pastries that can impress.
Whether or not you take pleasure in them for breakfast, dessert, or a particular deal with, they’re a pleasant addition to any event.
Progressive Methods to Customise Danish Pastries for Completely different Dietary Preferences
Vegan-Pleasant:
- Exchange butter with vegan margarine or strong coconut oil.
- Use almond milk or oat milk as an alternative of complete milk.
Gluten-Free:
- Substitute all-purpose flour with a 1:1 gluten-free baking combine.
- Add xanthan gum to make sure correct elasticity within the dough.
Low-Carb or Keto:
- Use almond flour mixed with coconut flour.
- Sweeten with erythritol or monk fruit sweetener for a low-carb possibility.
Protein-Enriched:
- Add a scoop of unflavored protein powder to the dough.
- Exchange common milk with high-protein milk alternate options like pea milk.
Nut-Free:
- Keep away from fillings or toppings with nuts, substituting with seeds or dried fruits.
Suggestions, Substitutions, and Variations
- Excessive-High quality Components: Use European-style butter and bread flour for the perfect taste and texture.
- Preserve It Chilly: The dough ought to stay chilly all through the lamination course of to forestall the butter from melting and the dough from turning into sticky.
- Number of Fillings: Experiment with completely different fillings, equivalent to fruit, cream cheese, or chocolate, to create distinctive taste combos.
- Form and Measurement: Strive completely different styles and sizes to make your pastries visually interesting.
- Dough Hook: Think about using a dough hook attachment on a stand mixer to help with lamination.
- To stop Sticking, Mud the baking sheet with a small quantity of flour combination earlier than inserting the pastry on it.
- Golden Brown End: Brush the pastry with an egg wash earlier than baking for a fantastic golden brown shade.
- Puff Pastry Substitute: For a barely completely different texture and taste, you should utilize puff pastry as an alternative of do-it-yourself pastry dough.
- Cheese Filling: For a scrumptious cheese filling, combine softened cream cheese with sugar, vanilla extract, and eggs, and unfold it on prime of the pastry earlier than baking.
- Different Sweeteners:
For these trying to scale back refined sugar consumption, think about using:- Honey: Provides a pure sweetness and a touch of floral taste. Use ¾ cup honey for each 1 cup of sugar.
- Maple Syrup: Supplies a wealthy, caramel-like style. Substitute ¾ cup maple syrup for 1 cup of sugar.
- Coconut Sugar: A minimally refined possibility with a molasses-like taste. Use it in a 1:1 ratio.
Different Flours:
- Swap all-purpose flour with complete wheat pastry flour for a barely nuttier taste or use a gluten-free baking mix to accommodate dietary restrictions.
Butter Alternate options:
- For a dairy-free possibility, substitute butter with vegan butter sticks or coconut oil (use chilled coconut oil for flaky layers).
Taste Enhancements
Spices:
- Add 1 teaspoon of cinnamon or nutmeg to the dough for a heat, fragrant contact.
- A pinch of cardamom can introduce a barely unique, floral taste.
Citrus Zest:
- Incorporate 1 teaspoon of grated lemon or orange zest into the dough so as to add brightness.
Vanilla or Almond Extract:
- Add 1 teaspoon of vanilla extract or almond extract for refined depth and sweetness.
Following the following pointers and variations, you’ll be able to create a wide selection of scrumptious and visually beautiful Danish pastries that can impress you.
The pastries are baked till golden brown, sometimes 15 to twenty minutes.
Retailer-bought pastries might comprise preservatives and components not current in do-it-yourself variations.
Adapting the Recipe for Seasonal or Vacation Themes
Winter/Vacation Theme:
- Incorporate spiced apple filling with cinnamon and nutmeg.
- Drizzle with a gingerbread glaze for a festive contact.
Spring Theme:
- Use lemon curd or strawberry filling for a vivid, tangy taste.
- Beautify with edible flowers for a chic springtime look.
Summer time Theme:
- Go for blueberry and cream cheese filling or peach preserves.
- Prime with a mild vanilla glaze and contemporary berries for a refreshing end.
Fall Theme:
- Strive a pumpkin spice filling with a touch of maple syrup.
- Add crushed pecans or a caramel drizzle for a comfortable fall vibe.
Celebrations:
- Form the dough into stars or hearts for holidays like Christmas or Valentine’s Day.
- Add meals coloring to the glaze to match the celebration’s theme.
Serving Recommendations
Accompaniments:
- Serve the pastries heat with a dollop of vanilla ice cream or a drizzle of custard sauce.
- Pair with a spoonful of fruit compote or whipped cream for added indulgence.
Presentation Suggestions:
- Use a serrated knife to slice the pastries cleanly.
- Mud the completed pastries with powdered sugar or drizzle with glaze for an expert contact.
- Prepare pastries on an ornamental platter lined with parchment paper to raise their enchantment for gatherings.
Storage and Reheating Directions
Preservation:
- Refrigeration: Retailer leftovers in an hermetic container for as much as 5 days.
- Freezing: Wrap pastries individually in plastic wrap and place in a freezer-safe bag for as much as 2 months.
Reheating:
- Oven: Preheat to 350°F (175°C), place pastries on a baking sheet, and warmth for 5-10 minutes for a contemporary, crisp texture.
- Microwave: Reheat for 15-20 seconds, however observe this will soften the outer crust.
Dietary Data
(Instance per serving, regulate based mostly on components used)
- Energy: 270
- Protein: 4g
- Carbs: 35g
- Fats: 12g
- Fiber: 1g
- Sugar: 10g
Reader Testimonials or Critiques
- “This recipe turned out wonderful! The layers had been so flaky and buttery.”
- “I added a contact of cinnamon, and it made the pastry irresistible. Thanks!”
- “Really easy to comply with. My household cherished it!”
So now you’ve the knowledge you might want to create pastry for the primary time—you want these recipes: Very Berry Strawberry Scones, Plum Puff Pastry Tart, Cream Cheese Danish Recipe, Simple Cherry Pie Filling Recipe, Walnut and Pear Crescent Rolls.